|
MokaByte
Numero 07 - Aprile 1997
|
|||
 |
(Java Packages) |
||
|
Marie Alm |
|
||
|
MokaByte
Numero 07 - Aprile 1997
|
|||
|
|
(Java Packages) |
||
|
Marie Alm |
|
||
![]() Ok,
you're faced with building a program or a suite of programs that are supposed
to come together as a cohesive whole as "The Project." This Project is
supposed to provide some particular functionality to the user so they can
accomplish some task. "Fine," you say, "no problem." The system architects
and engineers go to work and perform their system engineering and knowledge
engineering magic. The system design passes "The Review" and now it's passed
on to your Software Team. You have meeting after meeting with the other
software engineers to figure out how The Design can best be implemented
for optimal performance, incorporating lots of "forgotten" bells and whistles
- oh yes, and a really impressive User Interface that "shouldn't take much
time" and "certainly shouldn't be difficult."
Ok,
you're faced with building a program or a suite of programs that are supposed
to come together as a cohesive whole as "The Project." This Project is
supposed to provide some particular functionality to the user so they can
accomplish some task. "Fine," you say, "no problem." The system architects
and engineers go to work and perform their system engineering and knowledge
engineering magic. The system design passes "The Review" and now it's passed
on to your Software Team. You have meeting after meeting with the other
software engineers to figure out how The Design can best be implemented
for optimal performance, incorporating lots of "forgotten" bells and whistles
- oh yes, and a really impressive User Interface that "shouldn't take much
time" and "certainly shouldn't be difficult."
![]() As
the design for the implementation of The Project takes shape, you find
it is growing and growing. More things not accounted for in the original
System Design come into play. Finally, the "Implementation Design" is ready
- and it passes "The Review" too. Now it's forward onto coding. Each section
of the Implementation Design has been properly allocated to the person
or persons who are to code and unit test that section. From here on it
may seem self evident to all concerned how the project should be organized.
But if you have each person write down their opinion, you will very likely
get a different view from each person. It is important that from the earliest
possible moment, a scheme is put in place for organizing the code and associated
documents. This is a prelude to version control (aka configuration management).
It boils down to defining a coherent directory structure then enabling
the code such that the compiler can find all the files it needs to find.
Well, this is basic programming, right? Then why is there such disagreement
among the software team members regarding how this is best accomplished?
Instead of exploring that interesting topic, let's talk about how a Project
with many sections can be organized well.
As
the design for the implementation of The Project takes shape, you find
it is growing and growing. More things not accounted for in the original
System Design come into play. Finally, the "Implementation Design" is ready
- and it passes "The Review" too. Now it's forward onto coding. Each section
of the Implementation Design has been properly allocated to the person
or persons who are to code and unit test that section. From here on it
may seem self evident to all concerned how the project should be organized.
But if you have each person write down their opinion, you will very likely
get a different view from each person. It is important that from the earliest
possible moment, a scheme is put in place for organizing the code and associated
documents. This is a prelude to version control (aka configuration management).
It boils down to defining a coherent directory structure then enabling
the code such that the compiler can find all the files it needs to find.
Well, this is basic programming, right? Then why is there such disagreement
among the software team members regarding how this is best accomplished?
Instead of exploring that interesting topic, let's talk about how a Project
with many sections can be organized well.
![]() A
good approach is to look at the desired end product and see what the natural
groupings are. This can be done in terms of functionality or end result
or some characteristic. Then take each of these first groups and do the
same thing - breaking it into smaller groupings. Repeat this process until
no more natural groupings are apparent. Next go over it all again and see
if there is some other more logical or more appropriate grouping system.
This process is best accomplished by a small group of people closely associated
with the coding, for example the team leaders or 2 or 3 other experienced
programmers. This process ends when the small group of people agree to
the groupings. The end result of this can be translated almost directly
into a directory structure.
A
good approach is to look at the desired end product and see what the natural
groupings are. This can be done in terms of functionality or end result
or some characteristic. Then take each of these first groups and do the
same thing - breaking it into smaller groupings. Repeat this process until
no more natural groupings are apparent. Next go over it all again and see
if there is some other more logical or more appropriate grouping system.
This process is best accomplished by a small group of people closely associated
with the coding, for example the team leaders or 2 or 3 other experienced
programmers. This process ends when the small group of people agree to
the groupings. The end result of this can be translated almost directly
into a directory structure.
![]() Ok,
now it is ready for coding. And of course, it will be coded in Java. To
enable the code so the compiler can find all the files it needs to find,
Java provides a facility known as Packages. So, Java Packages are a way
of grouping things like classes together. The Packages are tied together
into a complete Project by either the import keyword or by explicitly giving
the Package name in the code statement where an item in the Package is
to be used.
Ok,
now it is ready for coding. And of course, it will be coded in Java. To
enable the code so the compiler can find all the files it needs to find,
Java provides a facility known as Packages. So, Java Packages are a way
of grouping things like classes together. The Packages are tied together
into a complete Project by either the import keyword or by explicitly giving
the Package name in the code statement where an item in the Package is
to be used.
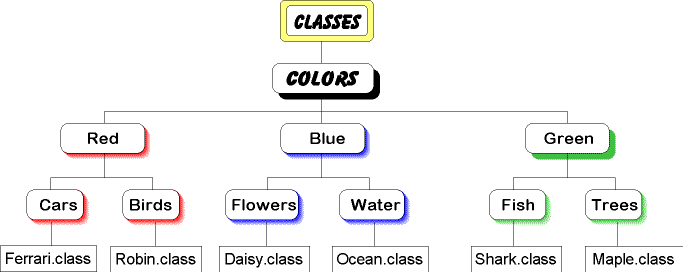
![]() For
an example, let's say the Project is called Colors. A natural grouping
for this would be one group for Red, one group for Blue, and one group
for Green.
For
an example, let's say the Project is called Colors. A natural grouping
for this would be one group for Red, one group for Blue, and one group
for Green.
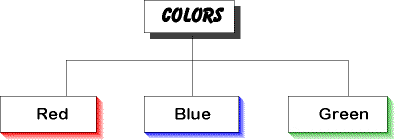
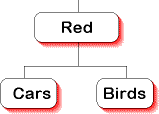
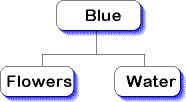
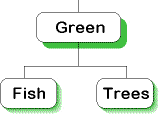
In the Red group, there
are Cars and Birds.In the Blue group there
are Flowers and Water.In the Green group there
are Fish and Trees.
![]() Now
the group all together, with some source files, looks like this:
Now
the group all together, with some source files, looks like this:

![]() It
may be that at a later time, we will want to add blue cars and green birds.
This set of groupings is well able to incorporate such additions without
destroying the structure.
It
may be that at a later time, we will want to add blue cars and green birds.
This set of groupings is well able to incorporate such additions without
destroying the structure.
![]() The
way to setup for the classes to be grouped into Packages, is to mirror
the above setup under a classes directory. It would look like so:
The
way to setup for the classes to be grouped into Packages, is to mirror
the above setup under a classes directory. It would look like so:
![]() The
Project then would be organized into a directory structure as below:
The
Project then would be organized into a directory structure as below:
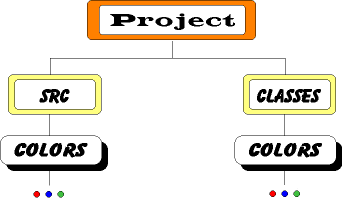
![]() Other
directories would most likely be placed under the project directory such
as one for documentation, one for version control, etc. Once the directories
are made, one for each box in the complete directory structure, the path
to the maple tree Java source code is:
Other
directories would most likely be placed under the project directory such
as one for documentation, one for version control, etc. Once the directories
are made, one for each box in the complete directory structure, the path
to the maple tree Java source code is:
/src/Colors/Green/Trees/Maple.java.
(For Windows, the / is replaced with a \ ).
![]() Now
for the source code. Let's say we are building Applets and the Maple.java
code wants to access the Blue Flowers. The code would look like this:
Now
for the source code. Let's say we are building Applets and the Maple.java
code wants to access the Blue Flowers. The code would look like this:
// file name: Maple.java// 'package' must be the first executable statement in the file
// The package name is the path to the class with '.'s instead of '/'s or '\'s
package Colors.Green.Trees; // put this class into the package
import Blue.Flowers.*; // allow access to another package
public class Maple
extends Applet
{
Daisy blue_flower;
// init method
public void
init()
{
blue_flower = new Daisy();
// do other initialization
}
// a method
public void
decorate_tree()
{
// do the function
// explicit access
abird = new Colors.Red.Birds.Robin();
}
} // end class
javac -d ../../../classes/Colors/Green/Trees Maple.java
![]() Now
all that remains is to write the HTML to invoke the Applet and you're done.
So far, all that we have discussed can be found in many places in Java
documentation. However, I have seen in only one place the key to making
this all work! The secret is in the HTML. Here is the APPLET tag to invoke
our Maple Applet:
Now
all that remains is to write the HTML to invoke the Applet and you're done.
So far, all that we have discussed can be found in many places in Java
documentation. However, I have seen in only one place the key to making
this all work! The secret is in the HTML. Here is the APPLET tag to invoke
our Maple Applet:
<APPLET WIDTH=110 HEIGHT=220 CODE="Colors.Green.Trees.Maple.class">
</APPLET>
![]() So
that's all. ##Organize your Project into more and more specific natural
groupings. Make a directory structure to reflect that - one for source
code and one for classes. Write your java code in the source directories.
Compile the source code and place the classes into the correct classes
directory. Set your CLASSPATH. And, in the HTML, prepend the package name
to the class name in the CODE attribute. You're done. A Project well organized
with Java packages will help decrease the amount of re-work and so will
help improve your productivity.
So
that's all. ##Organize your Project into more and more specific natural
groupings. Make a directory structure to reflect that - one for source
code and one for classes. Write your java code in the source directories.
Compile the source code and place the classes into the correct classes
directory. Set your CLASSPATH. And, in the HTML, prepend the package name
to the class name in the CODE attribute. You're done. A Project well organized
with Java packages will help decrease the amount of re-work and so will
help improve your productivity.
If you have any questions or comments about this article, please email me.
| In the words
of Scott McNealy (CEO Sun):
"Go Java!" |
|
|
||
|
|
||
 |
MokaByte ricerca
nuovi collaboratori
|
 |
|
|
||