|
MokaByte Numero 15 - Gennaio 1998 |
|
||
| |
di
|
Getting Started Using JRB |
|
| |
Un esempio pratico di questa tecnologia |
||
|
MokaByte Numero 15 - Gennaio 1998 |
|
||
| |
di
|
Getting Started Using JRB |
|
| |
Un esempio pratico di questa tecnologia |
||
Introduction
This paper shows you the steps to follow to create a distributed version of the classic Hello Worls program using Java Reflective Broker (JRB - pronounced jerby). Ive purposely taken and modified the document form JavaSoft "Getting Started Using RMI" to highlight both the differences and similarities between the two communication systems.
The distributed Hello World example uses an applet to make a remote method call to the server from which it was downloaded to retrieve the message "Hello Worls!". When the applet runs, the message is displayed on the client.
To accomplish this, you will work through the following three lessons:
There are three source files for the Hello World server and applet:
$HOME/java/examples/hello.
For example, to create the directory for your source files on Solaris, execute this command:
mkdir $HOME/java/examples/hello
Define a Remote Interface
JRB doesnt need a Remote interface: any Java class can be exported as a remote server. Even library classes can be exported without the need for the source code.
Write a Remote Class
To write a remote object, you simply need to:
Implement a Remote Classpackage examples.hello;
import cselt.jrb.*;
public class HelloImpl {
public String sayHello() {
return "Hello World!";
}
public static void main(String args[]) {
try {
HelloImpl obj = new HelloImpl();
Server.setPort(9999);
ObjectRef ref = Server.export("HelloServer", obj);
System.out.println("HelloServer exported");
} catch (Exception e) {
System.out.println("HelloImpl err: " + e.getMessage());
e.printStackTrace();
}
}
}
The remote class for the Hello World example is HelloImpl. The class contains the sayHello public method, which returns the string Hello World! to the caller.
Arguments to, or return values from, remote methods can be of any Java type, including objects, as long as those objects implement the interface java.io.Serializable. Most of the core Java classes in java.lang and java.util implement the Serializable interface. Local objects are passed by copy, and only the non-static and non-transient fields are copied by default. Any public method of a class can be invoked both within the virtual machine running the service and remotely.public String sayHello() {
return "Hello World!";
}
Create One or More Instances of a Remote Object
The main method of the service needs to create one or more instances of the remote object which provides the service. For example:
HelloImpl obj = new HelloImpl();
Export a Remote Object
For a caller (client, peer, or applet) to be able to invoke a method on a remote object, that caller must first obtain a reference to the remote object. Object references are created by exporting an object with the JRB runtime system through the export operation. export may take an extra string argument that specify the name of the exported object. If this argument is missing the JRB will assign a name to the object:
ObjectRef ref = Server.export(obj);
Most of the time the client will obtain a reference to a remote object as a parameter to, or a return value from, another remote method call. For bootstrapping, the client must be able to obtain the first reference to a remote object. The simplest way is for the server to listen on a well known port and export the object with a name also known by the client like the name "HelloServer" in example. The client can use a URL-based naming scheme of the form host:port/objectname to create an object reference, where objectname is a simple string name used in the export operation, such as HelloServer:
ObjectRef ref = new ObjectRef("duplex.cselt.it:9999/HelloServer");
Register a Remote Object
If starting a server on a well known port is considered restraining, the JRB system provides a Naming Server that allows you to bind a URL of the form host/objectname to the remote object, where objectname is a simple string name. Once a remote object is registered on the Naming Server, callers can look up the object by name, obtain a remote object reference, and then remotely invoke methods on the object. In the HelloImpl example the code:
Server.setPort(9999);
ObjectRef ref = Server.export("HelloServer", obj);
can be replaced by:
ObjectRef ref = Server.export(obj);
NamingRef naming = new NamingRef("myhost/NamingServer");
naming.rebind("myhost/HelloServer", ref);
Optionally, a port number can be supplied in the URL: for example myhost:1234/HelloServer. The port defaults to 6666. It is necessary to specify the port number only if you start the naming server on a port other than the default 6666.
Write an Applet that Uses the Remote Service
The applet part of the distributed Hello World example remotely invokes the HelloServer's sayHello method in order to get the string "Hello World!", which is displayed when the applet runs. Here is the code for the applet:
package examples.hello;
import java.awt.*;
import cselt.jrb.*;
public class HelloApplet extends java.applet.Applet {
String message = "";
public void init() {
try {
ObjectRef ref = new ObjectRef(
getCodeBase().getHost() + ":9999/HelloServer");
message = (String)ref.invoke("sayHello");
} catch (Exception e) {
System.out.println("HelloApplet exception: " +
e.getMessage());
e.printStackTrace();
}
}
public void paint(Graphics g) {
g.drawString(message, 25, 50);
}
}
Using the Naming Server
If the server has registered the object reference with the naming server, the applet must first lookup on the naming server and then call the remote object. The code fragment:
would be replaced by:ObjectRef ref = new ObjectRef(
getCodeBase().getHost() + ":9999/HelloServer");
Write the Web Page that Contains the AppletNamingRef naming = new NamingRef(
getCodeBase().getHost() + "/NamingServer");
ObjectRef ref = naming.lookup("HelloServer");
Here is the HTML code for the web page that references the Hello World applet:
Note the following:<HTML>
<title>Hello World</title>
<center> <h1>Hello World</h1> </center>
The message from the HelloServer is:
<p>
<applet codebase="../.."
code="examples.hello.HelloApplet"
width=500 height=120>
</applet>
</HTML>
There needs to be an HTTP server running on the machine from which you want to download classes. The applet's codebase attribute indicates the URL, as shown here:
codebase="../.."
The codebase in this example specifies a directory two levels above the directory from which the web page was itself loaded. The applet's code attribute specifies the fully package-qualified name of the applet, in this example examples.hello.HelloApplet:
Compile and Deploy Class Files and HTML Files
The source code for the Hello World example is now complete and the $HOME/java/hello directory has three files:
Some Web servers allow accessing a user's public_html directory via an HTTP URL constructed as "http://host/~username/". If your Web server does not support this convention, you may use a file URL of the form "file://home/username/public_html".
Compile the Java Source Files
Make sure that the deployment directory $HOME/public_html/codebase and the development directory $HOME/java/examples/hello are each visible via the local CLASSPATH on the development machine. To compile the Java source files, run the javac command as follows:
javac -d $HOME/public_html/codebase
HelloImpl.java HelloApplet.java
This command creates the directory examples/hello (if it does not already exist) in the directory $HOME/public_html/codebase. The command then writes to that directory the files HelloImpl.class and HelloApplet.class. These are the server, and the applet respectively.
Generate Stubs and Skeletons
Normally, the JRB will be used without using stubs and skeletons. The invoke operation of the ObjectRef class follows the principle of the Java Reflection API that dynamically creates an invocation and dispatches the call to the remote object. If, for any reasons, the programmer is happier with a static invocation model, such as the one supported by Java RMI, the JRB provides a stub generator that creates specialized object references. A specialized reference class is a subclass of ObjectRef class and provides the same public method of the exported remote object. For example, the Naming Server of the JRB is made up of the class Naming. By applying the stub generator to this class a NamingRef class is created that provides the same methods of the Naming class and is used at the client side for remote invocations to the Naming object. Note, however, that skeletons are still not necessary. In the Hello World example, if we want to use a specialized reference to the HelloImpl class we should apply the stub generator to the HelloImpl.class file:
java cselt.jrb.Stub examples.hello.HelloImpl
Note that the stub generator is written in Java. You could create an alias of the kind:
alias stub java cselt.jrb.Stub
The stub generator creates a HelloImplRef class that represents the specialized reference to the HelloImpl class. Then clients can use HelloImplRef with the static invocation approach rather than the dynamic model of the invoke operation:
HelloImplRef ref = new HelloImplRef(
getCodeBase().getHost() + ":9999/HelloServer");message = ref.sayHello();
This mode of operation is very RMI-like.
Move the HTML File to the Deployment Directory
To make the web page that references the applet visible to clients, the index.html file must be moved from the development directory to the codebase directory. For example:
mv $HOME/jdk1.1/mysrc/examples/hello/index.html $HOME/public_html/codebase/examples/hello
Set Paths for Runtime
Make sure that the $HOME/public_html/codebase directory is available via the server's local CLASSPATH when you run the HelloImpl server.
Start the Server and Applet
If youre using the naming server you need to start it first. To start the naming server, execute the command:
java cselt.jrb.Naming &
The naming server by default runs on port 6666. To start the naming server on a different port, specify the port number in the command. For example, to start the naming on port 2001:
java cselt.jrb.Naming 2001 &
If the naming server is running on a port other than the default, you need to specify the port number in the URL when making calls to the naming server. For example, if the naming is running on port 2001 in the Hello World example, here is the call required to bind the URL of the HelloServer to the remote object reference:
NamingRef naming = new NamingRef("myhost:2001/NamingServer");
Similarly, the URL stored on the web page needs to specify the non-default port number, or else the applet's attempt to look up the server in the registry will fail:
<PARAM name="url" value="//myhost:2001/HelloServer">
The following command shows how to start the HelloImpl server:
java examples.hello.HelloImpl &
Once the server is running, the applet can be run. An applet is run by loading its web page into a browser or appletviewer, as shown here:
appletviewer http://myhost/~myusrname/codebase/examples/hello/index.html &
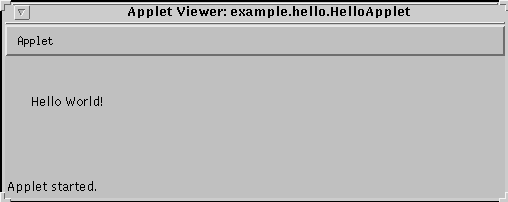
After running the appletviewer, you will see output similar to the following on your display:
|
|
||
 |
MokaByte ricerca
nuovi collaboratori.
|
 |
|
|
||